Jump to
Motorola FRP bypass without a Computer/PC guide is the best utility method to easily remove the FRP lock from Motorola Android devices. This free guide works for Moto smartphones and tablets, and it has some amazing features that help to completely unlock a Motorola device.
Bypassing Google account verification from Motorola phone in 2024 is a bit difficult but not impossible. We can achieve this by applying a correct step-by-step method, that can remove the previously submitted Google account details.
What’s more, if you are reading this post, then most probably you are stuck at the “Verify your account” screen. That screen appears after a Motorola device goes through a Hard Factory Reset operation.
We usually apply a hard reset operation to remove the password-protected screen. But, what happens next, is you need to enter the correct gmail ID and password of the synced Google account into your device.
Surprisingly, if you are wondering which Google account details you need to provide at the “Verify your account” screen. Let me make it easy for you, it could be the same Gmail account that you logged in to install the first application from the Google Play Store.
If you remember the Gmail ID and password of the account you used to download and install the apps from Play Store, then you should give it a try by entering the login details on verify your account screen.
Although this is a specific guide just for Motorola Android devices, if you want to apply the universal guide for bypassing Google lock, you can use the FRP bypass APK guide.
Motorola FRP Bypass Without Computer/PC 2024
However, if you don’t remember one of the login details, then the only solution we have is to bypass the FRP lock. This is a free method that helps a lot of people unlock their devices from FRP, and if you follow the guide correctly, you will be able to easily unlock your device as well.
Make sure to remove the SIM card and SD card from your phone, as the operation that we are going to follow could remove the SIM card and SD card data. This Motorola FRP Bypass APK is free to use and it has multiple useful features, that we don’t even see in the most paid FRP tools.
That means you don’t even need to buy a subscription from a third-party service provider. We created this guide for educational purposes so that authentic Android device owners can use it to unlock FRP without breaking the bank.
Motorola FRP Bypass Without PC/Computer | Step-by-step Guide
This is a simple and easy-to-follow step-by-step method for all Motorola Android users. It works for all Android versions from Android 6 to Android 14. Moreover, this one guide can help you bypass Google account verification not only for Smartphones but also for Motorola Android Tablets.
Make sure to follow each step carefully to get a smooth unlocking experience.
1. Tap on the Start button from the welcome screen.

2. Connect to a Wi-Fi network, and when you face the “Google verify your account” screen, go < back to the welcome screen.

3. Tap on “Vision Settings”, and then open “TalkBack”.

4. Next, we need to turn on the toggle of the “Use TalkBack” button. Just after that, you will see the “Welcome to TalkBack” screen, now draw a big reverse “L” on this screen.

5. After that, the TalkBack Mode On popup window appears on the screen, double tap on the “While using the app” option.
Then double tap on the “Use voice commands” button.
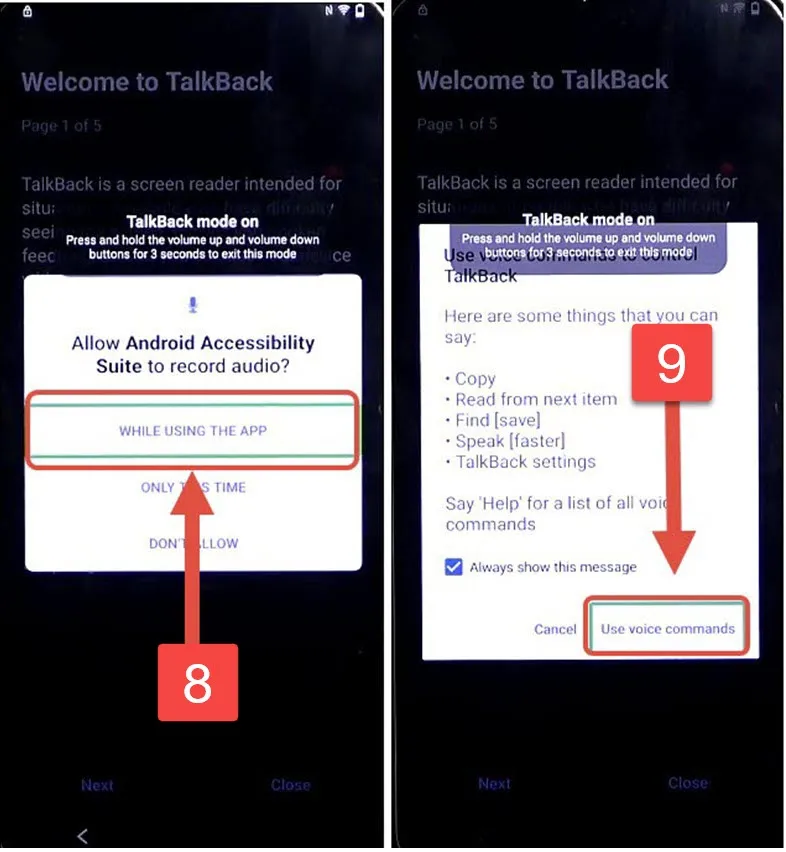
6. Once you select the use voice commands option, you need to quickly and loudly speak “Open Google Assistant” in the microphone of your FRP-locked Motorola device.
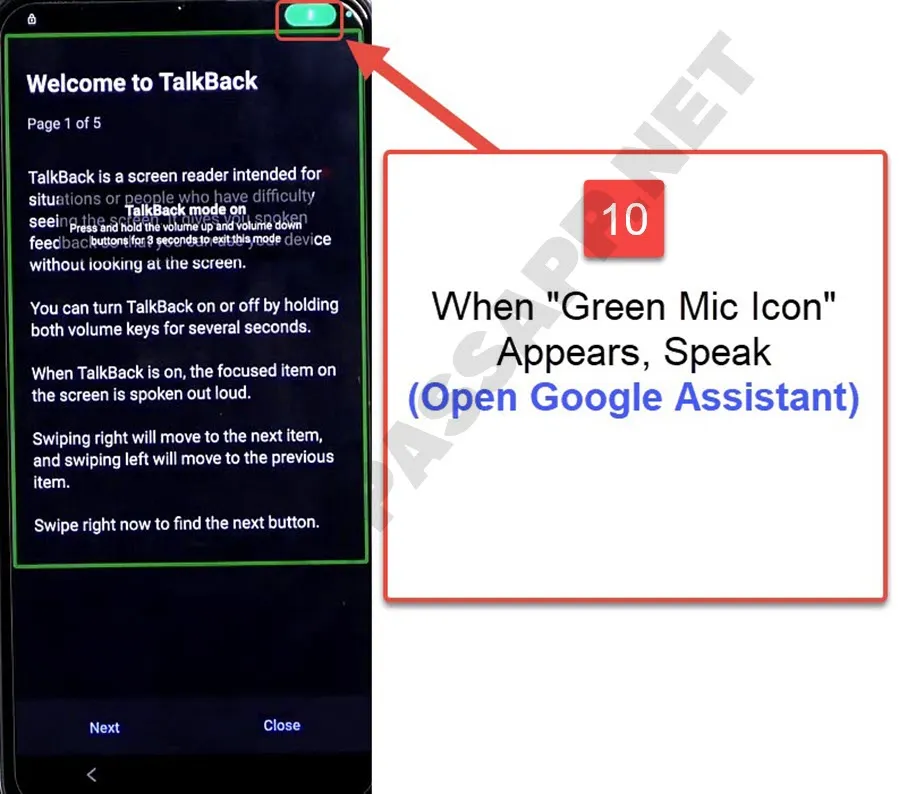
7. This will open the Google Assistant application interface, now again speak loudly “Open YouTube”.

8. Surprisingly, it will directly open the YouTube application into your Motorola FRP bypass device.

Now, we need to turn off the TalkBack settings, to do that, simply push and hold both the volume buttons together.
9. The Enable TalkBack shortcut popup appears on the screen, tap on the “Turn on” button.
After that, push and hold both the volume buttons together to turn off the TalkBack settings.

10. Once you do that, tap on the Account icon, and then go to Settings.

Motorola Android 13 FRP Bypass 2024 | Complete Guide
1. Go to “About” and then open the “Google Privacy Policy” button.

2. This will bring the Google Chrome Browser to your screen. Now, tap on the “Accept and continue” button and select No thanks.

3. Select the URL bar and then go to this URL: frpbypassapp.net and push enter.

4. Once you see the FRP Bypass APK website, simply go to the Android Application section and then tap on the “Set Screen Lock” app.

5. Next, you need to select the screen lock method.

6. Set a new PIN and then re-enter your PIN, and tap confirm.
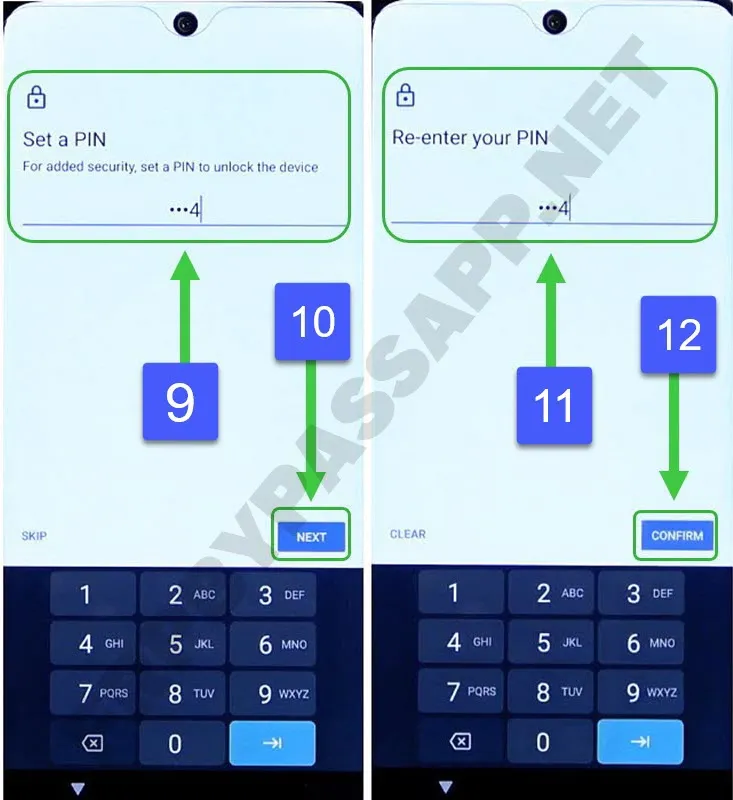
7. We might need to set a new screen lock multiple times. Make sure to select and enter the same screen lock PIN/Pattern/Password.
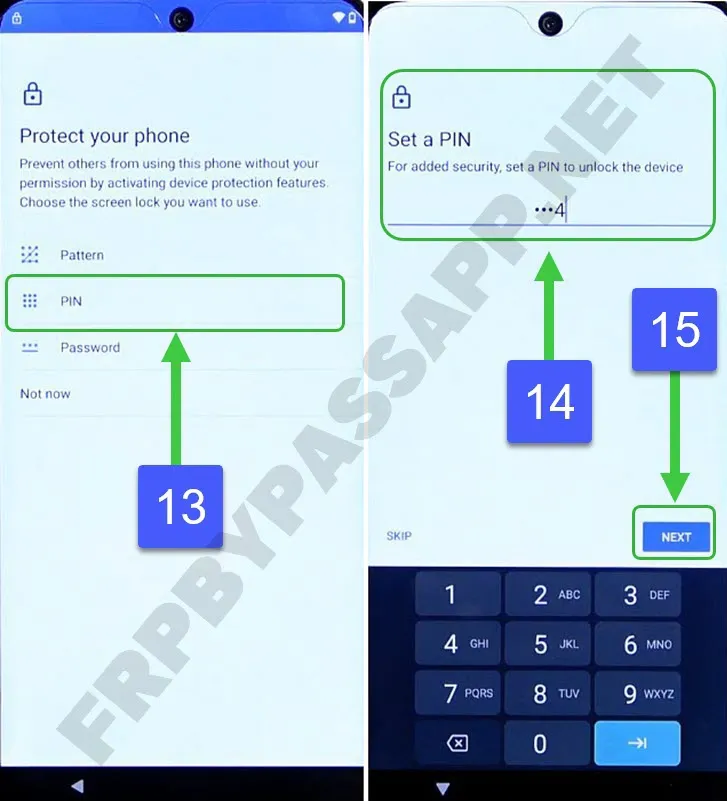
8. After trying 4 to 5 times, the app will show you a “Setting keeps stopping” message. Tap on the close app.
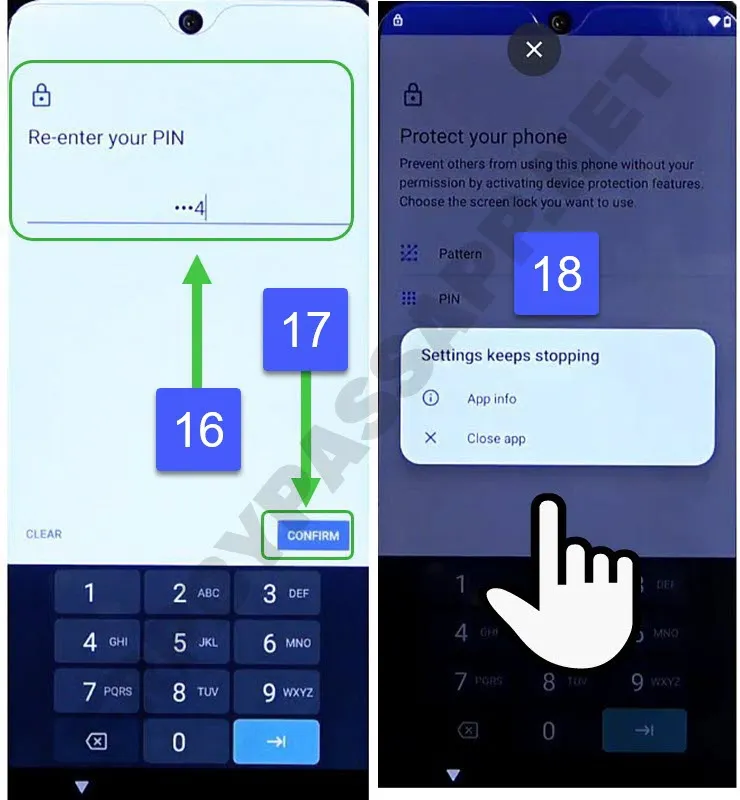
9. Then the Motorola FRP locked device screen will turn blank, push the < back button. Then again open the “Set Screen Lock” application.

10. After that, again choose the same screen lock method, and then enter the same PIN, Pattern, or Password of your choice.

11. This time, you will see the “Your screen lock is set” screen. Tap on the “Skip” button.

12. Next, we need to keep pushing the back < button until we reach the “Welcome Screen”.
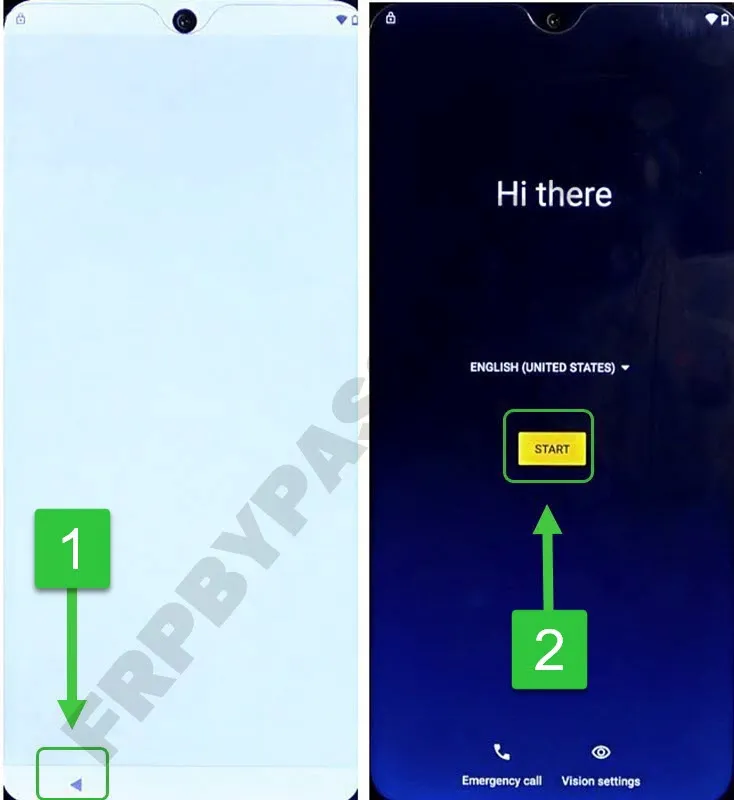
Completing Initial Setup After Bypassing Google Account Verification From Motorola
1. Tap on the start button, then skip connecting to the mobile network and also select “Don’t copy”.

2. Now, during the initial setup, you will face the “Verify PIN” screen. Now we need to enter the same PIN that we set in the previous steps.

After that, Skip the Google Sign-in page, we don’t need to Sign in to any Google account before completing the initial setup.
3. Next, skip account setup and then push the next button to complete the remaining setup steps.

4. During the final setup steps, the Motorola FRP lock device will again ask you to enter the PIN/Password.
Don’t worry, we will enter the same PIN, Pattern, or Password that we set before in the previous steps of this Motorola FRP bypass guide.
After that, simply complete the initial setup.

5. Once you use the “You’re all set” screen, now we can go to the Settings of your device.

Factory Reset Motorola Android Smartphone
It is advised to perform a Factory Reset procedure after bypassing the Google account verification. This is going to completely remove any copy of the Google account email and password.
However, you can also skip this step, but we need to make sure that we don’t face any difficulties with the Google account details in the future.
After removing the Google account details, you can easily sign in to any of your Google accounts during the setup wizard.
1. Go to the Settings of your device.
2. Open the System and then select “Reset options”.

3. Inside this option, you need to select “Erase all data (Factory Reset).

4. Then select the Erase all data button.
5. Finally, again tap on the erase all data button to completely remove Google account details from your Motorola device.

Conclusion
This was the complete guide, I hope after applying this free method you will be able to easily bypass Google account verification and FRP lock from your Motorola Android devices. If you feel any difficulty or problem while following the above method, feel free to comment below this post.
The voice commands are not allowed during setup. What do I do then?